Articles
Viewlity V2.0 - Diploma Project
- Details Hits: 9499
![]()
1. Overview
Viewlity is an Augmented Reality Engine for showing nearby points of interest on your Android phone. It's a powerful, easy-to-use tool for discovering places around you, finding the nearest fuel stations, coffee-shops, restaurants, ATMs, subway stations, places of worship and many other points of interest. You can also locate them on Google Maps, in order to get a wider point of view.
The experience of Viewlity is a different story for each user. By just looking though the camera and moving your Android phone left or right, Viewlity enriches the world that surrounds you.
1.1 Project goal
This project is in it's second phase of development. It started out as a summer school project, now being upgraded in order to be eligible for a diploma project. You can find lots of information regarding version 1.0 of Viewlity here.
One thing that was missing from the earlier release was the real-time touch of POIs (points of interest). By using only a small database of locations, the user experience is narrowed. Each day, there are thousands of POIs that are added across the globe and that the users would benefit from, if notified.
Also, more and more applications tend to use social networks to increase the experience, by connecting the user with his friends or coworkers. This is not the actual state of the application, but to ease further developments in this area, I chose to integrate Facebook, Foursquare and Google accounts in order to grab their Places service.
1.2 About myself
The team is assembled from two students of Politechnica University of Bucharest, faculty of Automated Science and Computers. We are Cristian Andreica and Vlad Petre. We are the Viewlity Android Team. Glad to meet you.
1.3 Screenshots
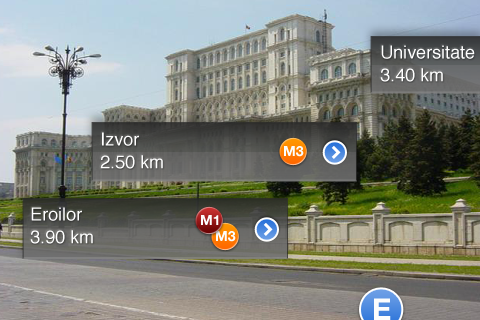
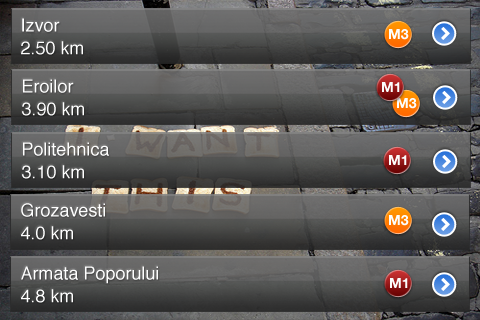
Let us see how this looks like when we are done. From left to right, we have the application splash screen, the city view where you just point your phone to a direction, and the list view where you can scroll down to see all the locations near you.


2. Application Behavior
The application is definitely one of the easiest you've used. Here are 3 steps:
- Start the application. It will show a splash screen, after which the camera will be started.
- Move the phone around. Point it to North, South, move it left or right and see locations near you.
- Rotate the phone to point the screen upwards and it will scroll the entire list of POIs.
- Oriented locations. Each location is identified by its name, distance to it, and angle to which the phone must be oriented so the location appears in front of the camera.
- Ordered POIs. Every list of locations in Viewlity is ordered by distance from the phone. We know that locations which are closer are far more important, so we'll show them first.
- Clickable POIs. A click will drive you to Google Maps, where you will find the POI that you clicked on, along with the entire list pinned on the map.
- Smooth Animations. You will find that POIs have a very smooth movement, and you can stop and capture each one on the screen. Scrolling through the entire list of locations is very accurately controlled by your phone orientation.
- Camera. You need to have a camera to see what's in front of you through.
- Location service. Viewlity uses the location service to calculate distances to the locations near you. A GPS receiver or AGPS will do.
- Compass. The application uses the orientation service to show only the POIs that are in front of you.
- Accelerometer. The speed to which the phone is moved/rotated is important for displaying the POIs in a smooth manner.
- Internet. Although the application does not require internet to work on your phone, it is recommended if you want to receive the Google Maps pictures for your map.
3. Development
The development has started on 26 of July 2010 and the first release is to be done before late September. The first week has been put to research, as we haven't developed an Android application before that. We were very familiar with Java programming language, so we just had to learn how the Android SDK works.
For those that want to jump right in, the SDK is to be found here.
The implementation should be compatible with the 1.5 OS (Cupcake) and all the later releases. Our plan was to support almost all the Android phones, with a higher interest in the ones with the following resolutions:
- 240x320
- 320x480
- 480x800
- 480x854
3.1 Input
The input for one Viewlity application is created by an entire team.
We are working with a designer, which delivers the icon, splash screen, pictures for showing the locations, and other small pieces of work. Also, the data for locations is preprocessed such that we end up with a file containing only the necessary data for that application.
Each Viewlity application contains an input file, called input.csv, which contain the POIs for this application. Each POI is identified by its name, latitude and longitude with high
precision.
3.2 Implementation
The application has been developed under the Model-View-Controller pattern.
The Model is represented by the input file that comes with the application and all the classes that load information from it.
The View is represented by all the classes that have a onDraw function, basically anything that is drawn to the screen (the locations in front of you, the bottom-list of all locations, cardinal points, etc.).
The Controller is the main core of the application, and is represented by the classes that make all the dinamics. Every sensor that is listened on the application (location, GPS, Accelerometer) interacts with the controller, which then updates the view.
As one could have already guessed, Viewlity requires only one extra intent, apar from the main application activity: the GMapActivity. This activity shows the Google Maps view that has all the POIs pinned in the map.

Algoritm
The main algorithm by which Viewlity was constructed can be narrowed to few important steps:
1. The activity receives notification that orientation has changed for the phone
2. Determine the new direction (angle from 0 degrees North) and inclination for the phone
3. For each component
- Calculate xValue, based upon the new direction
- Calculate yValue, bassed upon the new inclination
4. For each component
- Calculate its visible boolean variable, to tell if the component should be drawn on the screen or not, based upon its xValue and yValue
5. For each component
- IF component.visible == TRUE
- component.onDraw()
This algorithm is applied to each of the 3 type of components: the upper POIs, to show the locations in front of you, the cardinal points and the bottom list of POIs, which can be scrolled down by rotating your phone.
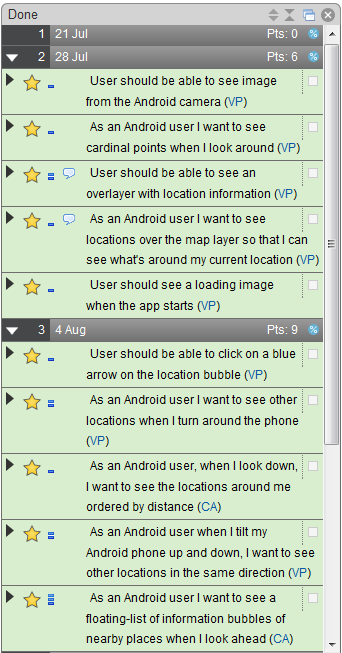
During the analysis part, we tried to come up with very small tasks, and each task was supposed not to require more than a work day. We enjoyed working with Pivotal Tracker, an agile-toolkit for managing your project (tasks up above).
3.2 Problems faced
Smooth dinamics
We were required to build something that can move fast on the screen, with at least 10 FPS. If we changed the position of the components by the distance described by the angle to which the phone has moved, we were getting fragmented motion. The first thing we did was implement an animation thread, one that receives notifications when the angle has changed and creates intermediary points for the motion, such that the animation becomes smooth.
Performance
In this type of application, on of the most important issues is performance. The requirements stated that we need to have fast and smooth animations for moving POIs.
We developed the first version on Nexus One, provided for us by the faculty. The device has 1 GHz CPU, allowing us to have no problem with the application performance. But we were required to support older phones, not so powerful.
The first try on a HTC Hero (T-Mobile G1) was a total failure. The locations on screen were moving with 0.5 FPS, and the components were moving with a 2-3 lag. The fixes for this issue were to eliminate the animation thread and come up with Kalman Filter algorithm for noise suppression. We moved all the processing on the GUI thread, carefully not to charge it too high. This improved our speed and eliminated the need for refreshing at each intermediary point in the motion.
Screen sizes
You also need to worry about which screen size you are going to support. Each phone has a resolution and a pixel density, and you should develop accordingly.
We tested on the Nexus One and had to scale most of the icons,pictures,images, text to fit to smaller resolutions or different pixel densities. One important hint is not to stretch images on-the-fly, because that tends to take a lot of while.
Big input
The next and final major issue we had is input. We were supposed to search in 12.000-20.000 POIs to get 20 POIs, which are the closest to the user. And that operation should take less than 5 seconds, to fit in the splash screen time.
