VoiceTasker
- Details
- Hits: 6936

1. Introduction
Our project allows the user to create and manage lists through vocal command. Specifically, it addresses that user who needs to manage any type of task list or shopping list. In addition to all the other features that u can find in any app currently on PlayStore, VoiceTasker implements the posibility to add prices to your items, edit a budget and be warned when you are close to / exceed that budget limit. Voice commands can be used to add items, add prices, add / edit your budget.
2. State of the Art
Currently the are a couple of apps with to-do-list functionality on Play Store and just a few apps that add the voice command feature. Among the best task-list apps out there we selected the following :
1. Task List ( https://play.google.com/store/apps/details?id=com.taskos&feature=search_result ) - displays basic task list options ( create, check, delete)
2. Task List - To Do List ( https://play.google.com/store/apps/details?id=no.intellicom.tasklist&feature=search_result ) - adds a priority functionality that also covers item sorting
3. Any.do To Do List & Task List ( https://play.google.com/store/apps/details?id=com.anydo&feature=search_result ) - adds voice input features
As we mentioned, our app will add a 'budget' functionality. This way, when creating a new list, the user will also have the option of setting a maximum amount to spend. Furthermore, after checking an item, we will also input via voice the price which will trigger a real-time-update of the total amount we spent until that particular moment. With each total or budget update, a dialog ( Toast ) will appear on the bottom of the screen and notify the user what percentage represents the total out of the allocated budget.
VoiceTasker also allows you to keep as many lists as you need, always saving your current state. This way, there's no need to re-check already-checked items, nor re-inputing prices.
3. Software Requirements
The main functionalities our app has are :
- creating new task list / shopping list
- show lists -> this will let the user choose what list he wants to edit or review
- long click on a list enables the rename and delete list options
- adding new item using voice recognition
- with a long click on a specific item, edit and delete item options are enabled
- by clicking an item the user will check it
- when checking an item, a voice window will open, which allows inputing a price through voice recognition
- setting a budget
- after each 'check' and price set, the total amount will be immediatly updated, and the user will be prompted how much out of the budget the total now represents ( in percentage )
- alert when budget is exceded
4. System Design
This app uses Android Voice Recognition API developed by Google, which is available since API Level 16 - android version 4.2.1. This means that you need to run 4.2.1 or later on your device if you want your voice commands recognised natively. For phones who run Ice Cream Sandwich or less, an Internet connection is required, since our app will send our voice and Google servers will match it to a text. This should not worry anyone though since it will generate a very small Internet traffic.
One of the best features Voice Recognition API offers is that you can use your native language, changing from the default one ( English ). This can be acomplished by changing your phone's language and also using an Internet connection ( even if you run the latest Android version, having for example romanian words recognised is not native so it needs to run through Google's servers.
The first layout the user encounters is the main menu which displays 3 buttons.
1. New List - when selecting this option an AlertDialog pops up allowing you tu choose between a simple list and a shopping list, choosing one will take you to a new layout depending on your choice.
2. Show Lists - selecting this option will change the layout to a new one that is divided in half vertically, containing a picture of a simple list and one of a shopping list. Both images are actually buttons, pressing one of them will result in loading those specific lists from the Internal Storage.
3. Exit - will result in exiting the app

Throughout our app's menus there is a clear difference between a simple list ( also called task list ) and a shopping list. This way, we use the same layout when creating a new simple list and when we load one, this being applied also for shopping lists.
When going over the basic differences between the two list types we can include :
1. A TextView which displays the curent total
2. A TextView which displays the budget, also allows editing the budget on long click
3. A Button which allows the budget to be changed through voice command
Saving and loading apps was acomplished through Json arrays, the specific files being placed on your phone's Internal Storage.
Our app creates two folders, one for simple lists and the other for shopping lists, this way you will always load only the corect ones, saving time and not needing to remember the names you gave for specific list types.
5. Implementation
We will start this section by describing the environment to use when developing for Android. Since we're talking about Android apps, Android SDK is required, then an IDE, Eclipse in our case, and then the ADT plugin for Eclipse. We strongly recomend downloading the ADT bundle supported by Google from this link http://developer.android.com/sdk/index.html, since it integrates all three components without any other configurations being needed.
As we mentioned in the previous section, only Android versions 4.2.1 Jelly Bean and higher can recognize voice natively, and that aplies only for English. When running with a different language set or on a previous version of Android, Internet is an important requirement, otherwise your voice won't be converted into text.
The minimum Android version our app requires is 2.2 Froyo, API level 8, so it adresses more than 98% of the Android devices out there.
As we mentioned previously, the main menu is the first layout the user encounters, this representing our app's first Activity.This displays 3 choises through 3 buttons :
1. New List - when selecting this option an AlertDialog pops up allowing you tu choose between a simple list and a shopping list, choosing one will take you to the selected layout and you can start creating your new list. We created an activity for each of the two options, having the main differences explained in section 5.
2. Show Lists - selecting this option will change the layout to a new one that is divided in half vertically, containing a picture of a simple list and one of a shopping list. Both images are actually buttons, pressing one of them will result in loading those specific lists from the Internal Storage.
3. Exit - will result in exiting the app


We implemented 14 classes, amongst which 7 Activities. Besides Activities, other classes implement Observers, PromptDialogs, AlertDialogs, the item object, and an adapter that extends BaseAdapter and it's used to populate our lists.
Even though when creating a new type of list and loading that same type of list you will find the same layout, those two windows represent different Activities. These two have a lot in common, but the main difference between them is the loading from file part of code which searches in the specific folder for the required file name and then reads the Json array populating the ListView and TextViews with the saved components ( items / prices / budget ).


What makes our app different from all the other task list apps out there is the price / budget feature that allows total control over the money you spend.
Basically, whenever you check an item, we consider that you bought or placed it in the cart, so a voice recognition dialog appears asking for the price, and placing it on the same row as the clicked item. Moreover, the total is updated, adding the new price. When you uncheck an item, the coresponding price is subtracted from the total, again updating it. So after each event that also modifies one or more prices, the total is updated. The budget can be added at any point either through the 'edit budget' button which uses voice recognition, or long pressing the Budget TextView which enables keyboard control.
Whenever the budget or prices are modified we want the user to be fully aware of his financial situation so we introduced a visual notification, changing the total's color. Hence, when the total goes over 80% of the budget, its color becomes orange, and when it reaches or exceeds the budget it becomes red. Of course, if the said total goes unde 80% of the budget, it will become black again.
By implementing long click and simple click events on the list, voice recogntion when adding items or editing the budget, we primarily aim at providing the user with what he/she needs most when shopping : simplicity, and a fast and intuitive interaction with a great personal organizer.


6. Testing
We tested our app using two very different phones : the Samsung Gio which runs 2.3.3 Gingerbread and the Galaxy Nexus running 4.2.2 Jelly Bean. We obtained a flawless experience on both phones after resolving all the bugs, the only difference being the Gio needed Internet connection even when talking in English since it's not native.
7. Conclusion
We had a lot of fun working on this project and learning how to develop for Android. Furthermore, since we think mobile devices still have a lot of unexploited potential, we intend to continue with Android and even publish an update for VoiceTasker as soon as possible.
RobotArm
- Details
- Hits: 8692
1. Introduction
"NXT Robotic Arm" application is based on a Lego Mindstorms Robotic Arm controlled by an Android device. This robotic arm imitates the movement of your real arm using three different interfaces. It provides you button control (for fine adjustments) and, on the other hand, sensor control (imitates the arm movements using the phone's gyroscope) and also an interface that allows you to write. We can control the movements on three axis (X,Y,Z). The writing tool can be used to draw numbers from 0 to 9 (letters will be drawn in our next version).
2. State of the Art
Searching the market we found a few applications that are similar to ours (but they control different types of Mindstorms robots): NXT Remote Control https://play.google.com/store/apps/details?id=org.jfedor.nxtremotecontrol&feature=search_result (for a vehicle based robot, controlling only the wheel motors), Stream-O-Bot https://play.google.com/store/apps/details?id=edu.snc.android.mindstorm&feature=search_result (still a vehicle based robot, but it allows you to put your phone on it, and stream video to anther phone,but it doesn't use the gyroscope and it will no longer be updated), NXT Simple Remote https://play.google.com/store/apps/details?id=NXT.Simple&feature=search_result#?t=W251bGwsMSwxLDEsIk5YVC5TaW1wbGUiXQ.. (this app uses only 2 motors at once and doesn't have a gyroscope controlling option). There are several applications on the market, but neither of them specifically built for controlling a robotic arm which follows the movement of your human arm and tries to write numbers.
3. Software Requirements
"NXT Robotic Arm" is an application designed to control a Lego Mindstorms Robotic Arm as it follows:
- it connects your phone through Bluetooth with the NXT Brick
- gives you direct control to all three motors, with the possibility to adjust the power (independent for each engine), using Button Mode
- it has a Sensor Mode in order to follow the movement of your arm, while keeping the phone in your hand
- it has a predefined Drawing Mode for all the digits (0 to 9)
- Voice Control for Drawing Mode
4. System Design
"NXT Robotic Arm" uses Bluetooth connection to communicate with Lego Mindstorms NXT which is a programmable robotics kit with: 3 servo motors, 4 sensors (ultrasonic, sound, touch, and light), 7 connection cables, a USB interface cable, and the NXT Intelligent Brick. The Intelligent Brick is the "brain" of a Mindstorms machine. It lets the robot autonomously perform different operations.
The application provides you three different interfaces :
1.The button control interface has six buttons which control all three engines. The power of each engine can be changed using the three seek bars on the bottom of the screen. You have to be careful with the power (100% may be too much ).
2.The second tab is the sensor interface which is based on the Phone's gyroscope and accelerometer. It is easy to use because you have some hints in the application. Basically it uses up, down, left or right movements.
3.Draw mode is the third tab. This part of the application allows you to select the number that you want to be drawn by the robotic arm. It also offers you voice control for selecting the digit that you want.
If the Bluetooth connection is not active ( you will see a red message with the text :"Not connected ") you can try to reconnect the Android device to the NXT using the Connect option from the Setting Menu ( you can also search for devices using the Scan button).
5. Implementation
We use Lego NXT 2.0 that provides three servomotors, four sensors (ultrasonic, sound, touch, and light), 7 connection cables, a USB interface cable, and the NXT Intelligent Brick. Our application uses Bluetooth connection to communicate with the Android device.
For best user experience we advise you to build your personal Robotic Arm as follows, but the most important thing is to place the engines in the right way: one for horizontal rotation - base rotation - and the other two for vertical movements :


In terms of implementation we use Android SDK. This tool provides you the API libraries and developer tools necessary to build, test, and debug apps for Android. We recommend you to get the ADT Bundle if you want to start developing apps. It includes the essential Android SDK components and a version of the Eclipse IDE with built-in ADT. The minimum version required for our application to run is version 8, but we recommend you install the application on a device with Android 4.0 or higher.
Basically the project has two activities : one for device detection and another one for control. The first activity gives you a list with detected devices and the possibility to scan again for new devices . From this list you have to select NXT. 
The second activity gives you three different types of control using a Tab Widget if the device is connected.
The first Tab is the Button Mode tab. This interface lets you control the power of all three engines easily because it has six custom Buttons - Image Buttons - (two for each engine) and three Seek Bars for power control (also, one for each engine). All those components use events behind the interface (for the six buttons we use onTouchListener event and for the three seek bars onProgressChangedListener event). This has also three TextViews which show the current seek bar percentage.

The second tab is Sensor Mode. Using a Dialog Fragment we are able to display a pop-up which shows the user how to control the robotic arm through the sensors. This fragment uses a check box which updates an instance of shared preferences that tells the application if it should automatically show the fragment if tab is open, or not (a "Don't show this again" check box).
In order to control the arm we use input from the accelerometer and orientation sensor: when the tab is open there is an orientation dead zone set around the current orientation of the phone. Any orientation change of the phone to the left or right outside of the dead zone changes the arm's base to move left or right. The accelerometer is used to measure the gravitational force and through that to define active zones where the phone is tilted up or down (to move the middle arm up or down) or tiled left or right (to move the upper part of the arm up or down - left is for down and right is for up -). To provide the user with feedback when the phone is inside an active sensor zone we have implemented a fragmented circle which light up different parts depending on which sensor zones are currently active and moving one of the robot's motors.


The third tab is Draw Mode. It is also using a Dialog Fragment to display a pop-up which tells the user how to use the drawing mode and it has the check box button too (with the "Don't show this again"). In this mode you can draw numbers from 0 to 9 by cycling through available numbers using the two buttons or using the Voice Control. 

6. Testing
In the first stage we tested the Bluetooth connection with one button to move one motor. After that we added buttons for all the three motors.
Next we added sensor mode, and we tested how the accelerometer and orientation sensor works, and we adjusted the active zone limits to not be overly sensitive but still only require small movements to enter them.
Most of the time we spent trying to draw the numbers because the arm is not so precise and it has only circular movement and we needed to draw straight lines.

If you want to see final results you have to get the application.
7. Conclusion
The "NXT Robotic ARM" is the application designed to control the Lego Mindstors Robotic Arm. Using Bluetooth connection, it gives you direct control to all three motors in two ways: button control and sensor control.
It provides a tool for drawing digits (0 to 9) and has also a voice control for this tool.
For the next version we will try to make the robotic arm to draw the alphabet.
Mood Player
- Details
- Hits: 14681
1. Introduction
Our project is an app that uses face detection and mood recognition to determine the user's mood and based on this, it gives a personalized playlist. The face detection algorithm is based on the OpenCV library, while the mood detection part will be based on pattern matching. Once we have the information needed, we'll use the last.fm database which links every song with tags that describe it.2. State of the Art
By doing research on Google Play, we didn't find an app which has the same functionality as what we want to do. Some of them will do only mood detection, others will create playlists based on a mood given by the user, but no application combines both of the functions.The majority of mood detection mobile apps use fingerprints, and very few use face detection, an example being Facescanner:
https://play.google.com/store/apps/details?id=com.wideapps.android.facemoodscanner&feature=search_result#?t=W251bGwsMSwxLDEsImNvbS53aWRlYXBwcy5hbmRyb2lkLmZhY2Vtb29kc2Nhbm5lciJd
Although we didn't expect perfect mood detection, Facescanner doesn't have a good functionality and it fails to recognize even obvious moods such as happy, sad, etc. Another problem with it is the big number of moods it tries to recognize, which will mislead the user.
For the playlist part, there are some good apps that give the expected results:
Stereomood
https://play.google.com/store/apps/details?id=com.mutado.android.stereomood&feature=search_result#?t=W251bGwsMSwxLDEsImNvbS5tdXRhZG8uYW5kcm9pZC5zdGVyZW9tb29kIl0.
Moodagent
https://play.google.com/store/apps/details?id=com.moodagent.android&feature=search_result#?t=W251bGwsMSwxLDEsImNvbS5tb29kYWdlbnQuYW5kcm9pZCJd
3. Software Requirements
This application is designed in order to generate a playlist according to the user`s mood and offers the following functionalities:-set your mood manually: happy/sad
-get your mood automatically by analyzing a periodical camera capture(frequency can be set from menu)
-set the music tempo, from calm to energetic
Having this data, the user emotion is given a specific tag and then using the last.fm database and the YouTube Api, a list of appropiate songs is loaded and played automatically. In this way, the user will have the song and also the YouTube video required.
Mood Player also offers the possibility to post the current playing song and a desired status on your own Facebook wall, only by logging in and clicking the share button.
4. System Design
"Mood Player" is an app which needs Internet Connection, as it loads and plays videos in real time.When first launching the application, the user has to take two photos of himself, a sad and a happy one, which will be later used as patterns for face detection.
"Mood Player" was designed as a single user app, being personalized with mood captures, but you can reset the initial photo set anytime.
The app uses the front camera to take pictures without the user noticing and creates a playlist based on the detected mood and the energy level which is set by the user. If the user doesn`t want to listen to a song according to his current detected mood, he can change it manually. This choice is useful if someone wants to change his negative emotional state by listening to some happy motivational songs.
5. Implementation
We have used the Android SDK from the Android Bundle to develop this project. Mood player is also based on three external sources: the openCV library, the facebook SDK and the youtube API for Android, so you will need to link these with the project if you want to build it by yourself.The source files are here: https://github.com/alinmindroc/facedetection
The project has four activities:
1. The face detection activity:
It's role is to take the pattern pictures for face detection.
It occurs only at the first use of the app, or when the user wants to reset the pattern pictures.
This is based mainly on a camera view that displays input from the front camera and detects the user's mouth. After taking the two pictures, we can go right to
the music player.
2. The music player activity:


You can see examples of the two modes of the player, the one on the left with face detection deactivated, and on the right, where face detect is checked, the app takes pictures of the user at a specified interval and it determines a mood for the user.
In the first mode, the user must select a mood and an energy level for the player to start and download a playlist.
The face detection works basically as follows:
- the app has two photos, with a sad (1) and a happy (2) expression of the current user. These are obtained in the first activity.
- at a certain moment, the app has a picture (3) of the user, from which it extracts the significant part. It could be the face, the eyes, or, as in our case, the mouth, as it can be used very easily to detect sad/happy moods.
- we get two floating point values by simply computing the norm of the pixel-by-pixel difference of the current mood(3) and each of the pattern images (1) and (2). This works
because the significant parts of the photos have small dimensions, so there can exist observable differences.
- we compare the norm of the differences, and the lower one sets the current mood(if the norm of the difference (1) - (3) is lower than the norm of (2) - (3), we have a sad mood).
For the playlist part, the workflow is:
- we have a mood returned by the face detection algorithm.
- we combine that with the energy level set by the user to create a tag and then an URL, for example http://www.last.fm/tag/happy%20hardcore/videos for the "happy hardcore" tag. Other tags are sad, happy, angry, calm, etc.
- we fetch the html source of the page, parse it and create a list of youtube IDs.
- we use the youtube api to generate a playlist based on these IDs.
The songs' titles are taken from the last.fm database, which associates a tag to every song, some tags being moods that we can use in the app, for example:
http://www.last.fm/tag/happy/tracks gives a full list of happy songs. Then, based on this list, we use the youtube api to create a music
playlist which you can browse in the embedded player. We have also included some songs on our own, to create some diversity.
3. The facebook activity:
This is opened if you want to share the song you are currently listening to on facebook. It is a simple login interface followed by a dialog where you can put some
extra text for the facebook post.
4. The hints/settings activity:
This is opened when an option is selected from the menu soft key. It allows the user to set the interval for face detection. It also gives some hints for the good use of the
application.
6. Testing
We have tested the application on two android 4+ phones, so we are sure it works on this and the following versions. However, the youtube api needs a minimum version of android 4. The app also needs a front-camera phone and wi-fi connection.7. Conclusion
Mood Player is an app that detects the user's mood and then creates a playlist of songs. We have met some challenges in the development process, and we have learned a lot about Android programming in general. A possible improvement for the app might be a better mood detection algorithm.TreasureHunt
- Details
- Hits: 9459
1. Introduction
"TreasureHunt" is an interactive Android application with a main social component that aims to revolution the way people spend time together. It's based on the idea of having a master of the game that initializes a session by placing items all over the playground, items which cannot be seen by the rest of the players. Instead, the teams are guided by speech indications given based on the current orientation and the distance to the clue. The current orientation is being constantly computed by some function that collect data from sensors and compare it to the absolute position set by the creator of the game . Once a player is around the requested spot, he unlocks the hint placed in that area. This step involves using an AR module that shows the clue on the phone's screen only when it is in the camera's view range.The picture that overlays can containing a new object to found, a person to recognize or anything that can be hidden by a picture.
2. State of the Art
There are some applications that have already implemented the idea of treasure hunt using GPS coordinates and QR codes for finding the hidden objects on the map. However, our application comes with new features: the clue, when found, will be revealed using AR (that means "fun++") and real time feedback with directions in order to guide the player (that's because the user will not have the exact coordinates of the treasure).- Munzee - Scavanger Hunt: its main disadvantage is that it requires going to the place where the user wants to hide the treasure and mark the spot using a QR code soooo it's not easy to use!
- Geocaching: it is very expensive and it is not that fun since it only demands you to find the place indicated by the GPS coordinates, end of story
- c:geo: it only shows preset items on the map and it does not provide user interaction, you cannot enable or disable a specific hint, start a local game, because it's based on existing sites
3. Software Requirements
"Treasure Hunt" aims to assist players to find the clues added in a virtual environment game by supporting the following functionalities:- two main playing modes: "Create game" and "Join game"
- showing the current location's map and also pinning clues or adding hints on some specified locations for the "Create a Game" Mode
- geo-location and compass orientation using GPS coordinates
- client-server communication: clients should be able to choose a previously created game and join
- storage for the parameters of the games and also for the resources: images
- start searching and receiving directions;
- Augmented Reality for showing hints, by making visible a certain picture hidden by the game's manager
The application also provides speech indications when the player has reached an approximate area, guiding him to "Turn Around", "Keep Walking", "Turn left" and other indications.
4. System Design
The application has been designed and tested for Android 4.0 Ice Cream Sandwich, which is why, on lower versions, it might not offer its full functionalities ."TreasureHunt" requires a phone with the following specifications: GPS Sensors and a Camera, in order to track the location in real time and interact with the game.
First of all, it offers a graphical interface for choosing between: "Create game" or "Join Game", options that map on the client-server model.
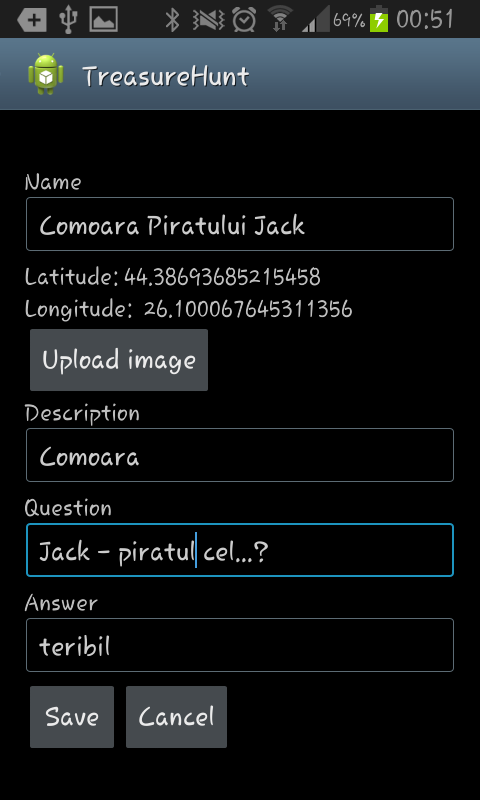
In the "Create Game" interface, the user is able to place hints on a map, map that specifies the surroundings using GPS location. A new game can be configured with multiple options, such as description, expiration time, question and answer to unlock the hint. The data inserted is sent to the server and it will be accessed later by the players that join that specific game.
In the "Join Game" interface, the user gets to interact with the most attractive part of the application, since it only has speech indications and an approximate area to search and find the clue.
The background calculus makes sure that the user goes towards the hidden object, by collecting data from the sensors and suggest certain indications in real time.
Once the phone gets around chosen spot, the Camera Option is activated and the user can scan the area for finding the clue, still being permanently assisted by the speech indications.
The last step of unlocking the clue requires inserting the right answer in an answer box which pops on screen when the local coordinates correspond to those retrieved from the server for the current game.
5. Implementation
We have implemented several modules, for offering the functionalities expected, such as:1. Google Maps API by using Google Play Services Library for loading maps on which will be placed specific markers
2. Google End Points API for data storage
3. Web Speech Recognition API, for speech indications
Orientation and Calculus
Data Storage for Info and Images
Augmented Reality for hiding pictures
Speech Recognition - Text To Speech Indications
User Interface and Options


6. Testing
We tested our application on three phones: Samsung Galaxy S2, running Android 4.1.2 version, LG p690 running Android 2.3.4 and Samsung Galaxy S Advance, running Android 2.3.4.You will need a 4+ Android Version to load Google Maps V2, an Internet Connection to receive information about the treasure and the GPS service enabled.
Our application asks you to turn on your GPS so that you are aware of this fact.
Your phone will also requires a functional camera, in order to get the camera's angle to compute the local orientation and to scan the area, when needed.
7. Conclusion
Treasure Hunt is a virtual environment that comes to assist the on-site game, because it minimizes the time given for preparing the game and it is also a fun and easy to use tool.We will improve the application's interface and we are thinking of introducing a Team Mode, in which team members are able to see each other's progress and help their team.
FriLoc - Your Friends Locations
- Details
- Hits: 7753